> For the complete documentation index, see [llms.txt](https://codifi-fdm.gitbook.io/codifi-docs/llms.txt). Markdown versions of documentation pages are available by appending `.md` to page URLs; this page is available as [Markdown](https://codifi-fdm.gitbook.io/codifi-docs/mobile-app/mapping-locations/draw-mode-and-editing.md).

# Draw Mode & Editing

Draw Mode is where you edit, refine, and manage Record locations on the map. Whether you're adjusting a single point, reshaping a boundary, or referencing existing features, everything happens here.

***

### Magnet Snapping

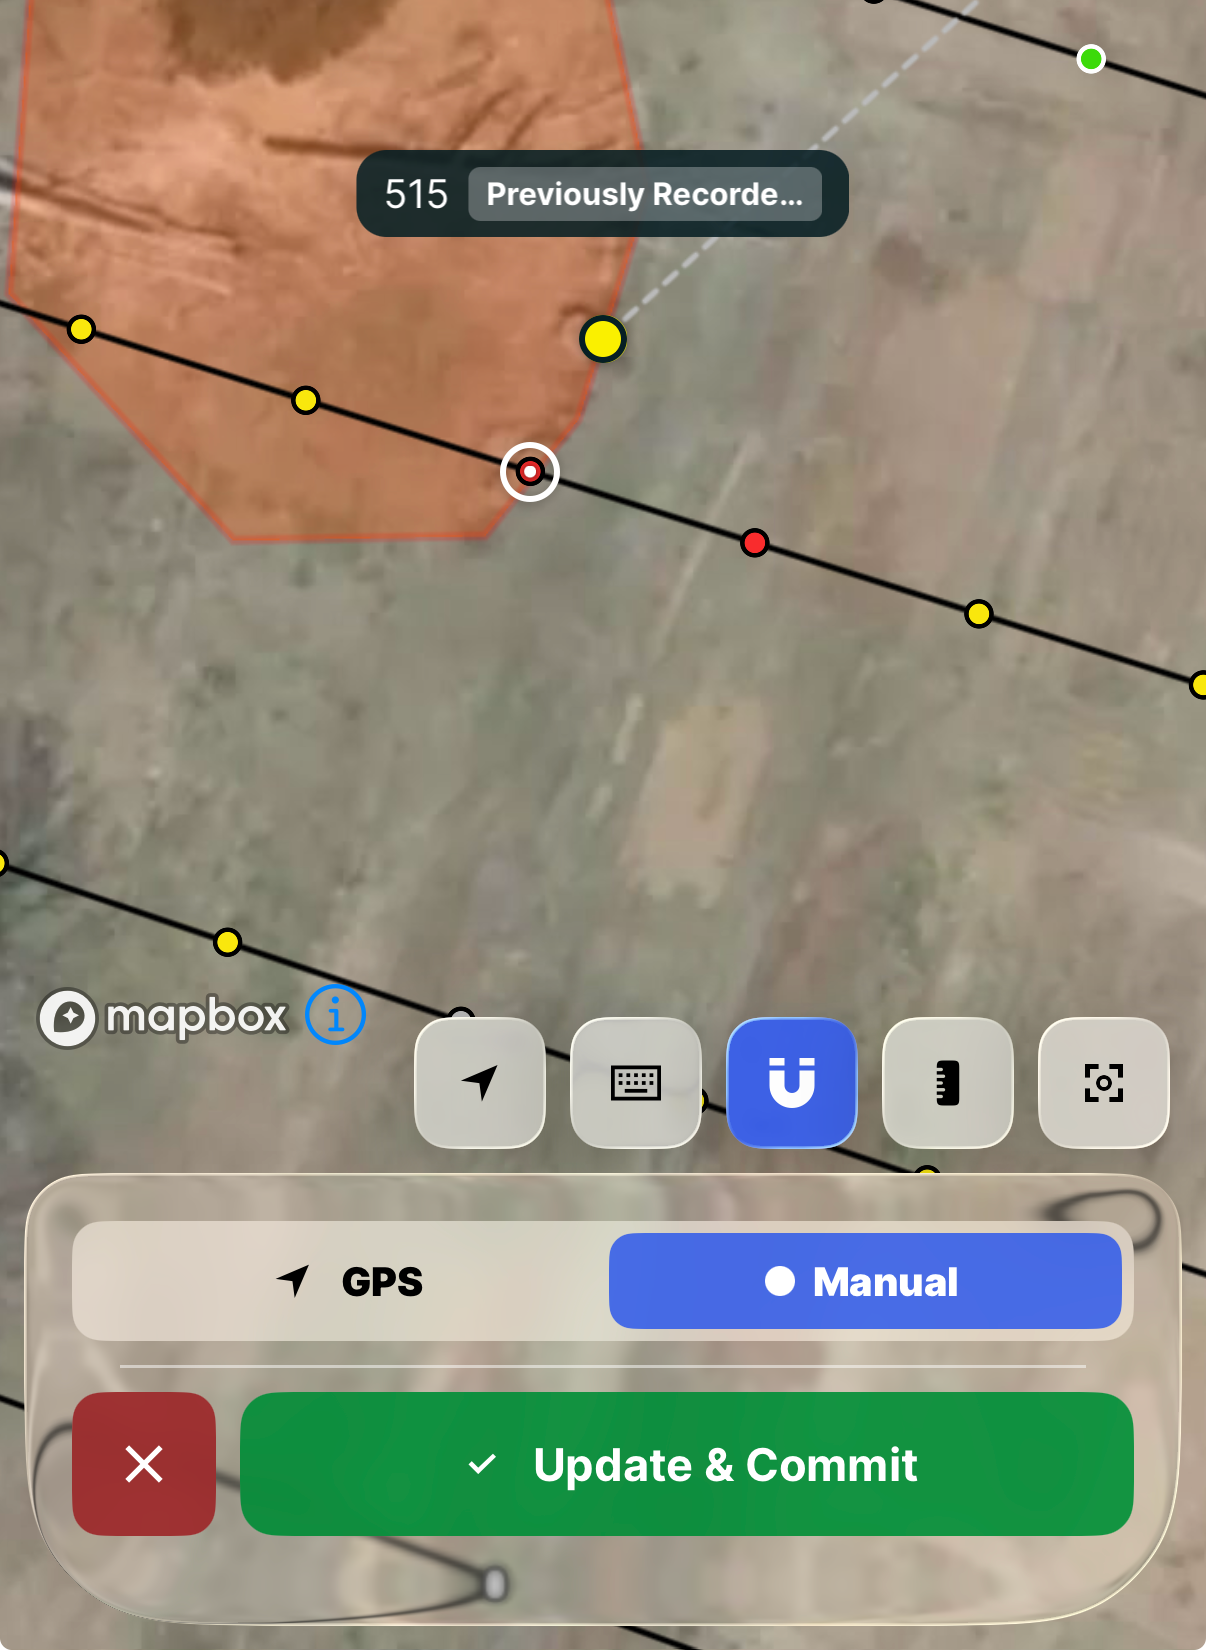
Turn on the **magnet** in the draw tools and the crosshair pulls itself onto geometry that is already on the map. A label appears the moment you lock on, telling you exactly what you are about to snap to, so a shared boundary lands precisely on top of its neighbor instead of almost.

The magnet stays on until you switch it off.

**What it snaps to:**

* **Your Records.** Corners and edges of existing points, lines, and polygons.
* **Anywhere along a line or polygon, not only at the corners.** If you need a point two thirds of the way along a boundary, the magnet will hold you exactly on that line.
* **Overlay features.** Anything in a GIS Overlay loaded into the Project.
* **Basemap geometry.** On a vector basemap (Streets, Outdoors, or Satellite Streets) that includes roads, buildings, and contours.
* **Your own live GPS position**, so you can drop a vertex precisely where you are standing while placing the rest by hand.

{% hint style="info" %}
**Snapped points remember that they were snapped.** Codifi records how each point was placed, so months later you can still tell exact, snapped geometry from geometry that was positioned by eye.
{% endhint %}

<figure><img src="https://3544178300-files.gitbook.io/~/files/v0/b/gitbook-x-prod.appspot.com/o/spaces%2FJ8P3pqhxdFwQkIOjOUut%2Fuploads%2Fgit-blob-a5d1583feeaebe1cd2d39de350ec26504ff1bf78%2Fdrawmode-mobile-magnet-snap.png?alt=media" alt="Draw Mode on mobile with the magnet button highlighted blue, the crosshair locked onto a line between two recorded points, and a label above naming the feature"><figcaption><p>The magnet (blue) holds the crosshair on the line rather than near it, and the label names what you locked onto. Capture is set to <strong>Manual</strong>, so the vertex lands at the crosshair instead of at your GPS position.</p></figcaption></figure>

***

### Offset Capture

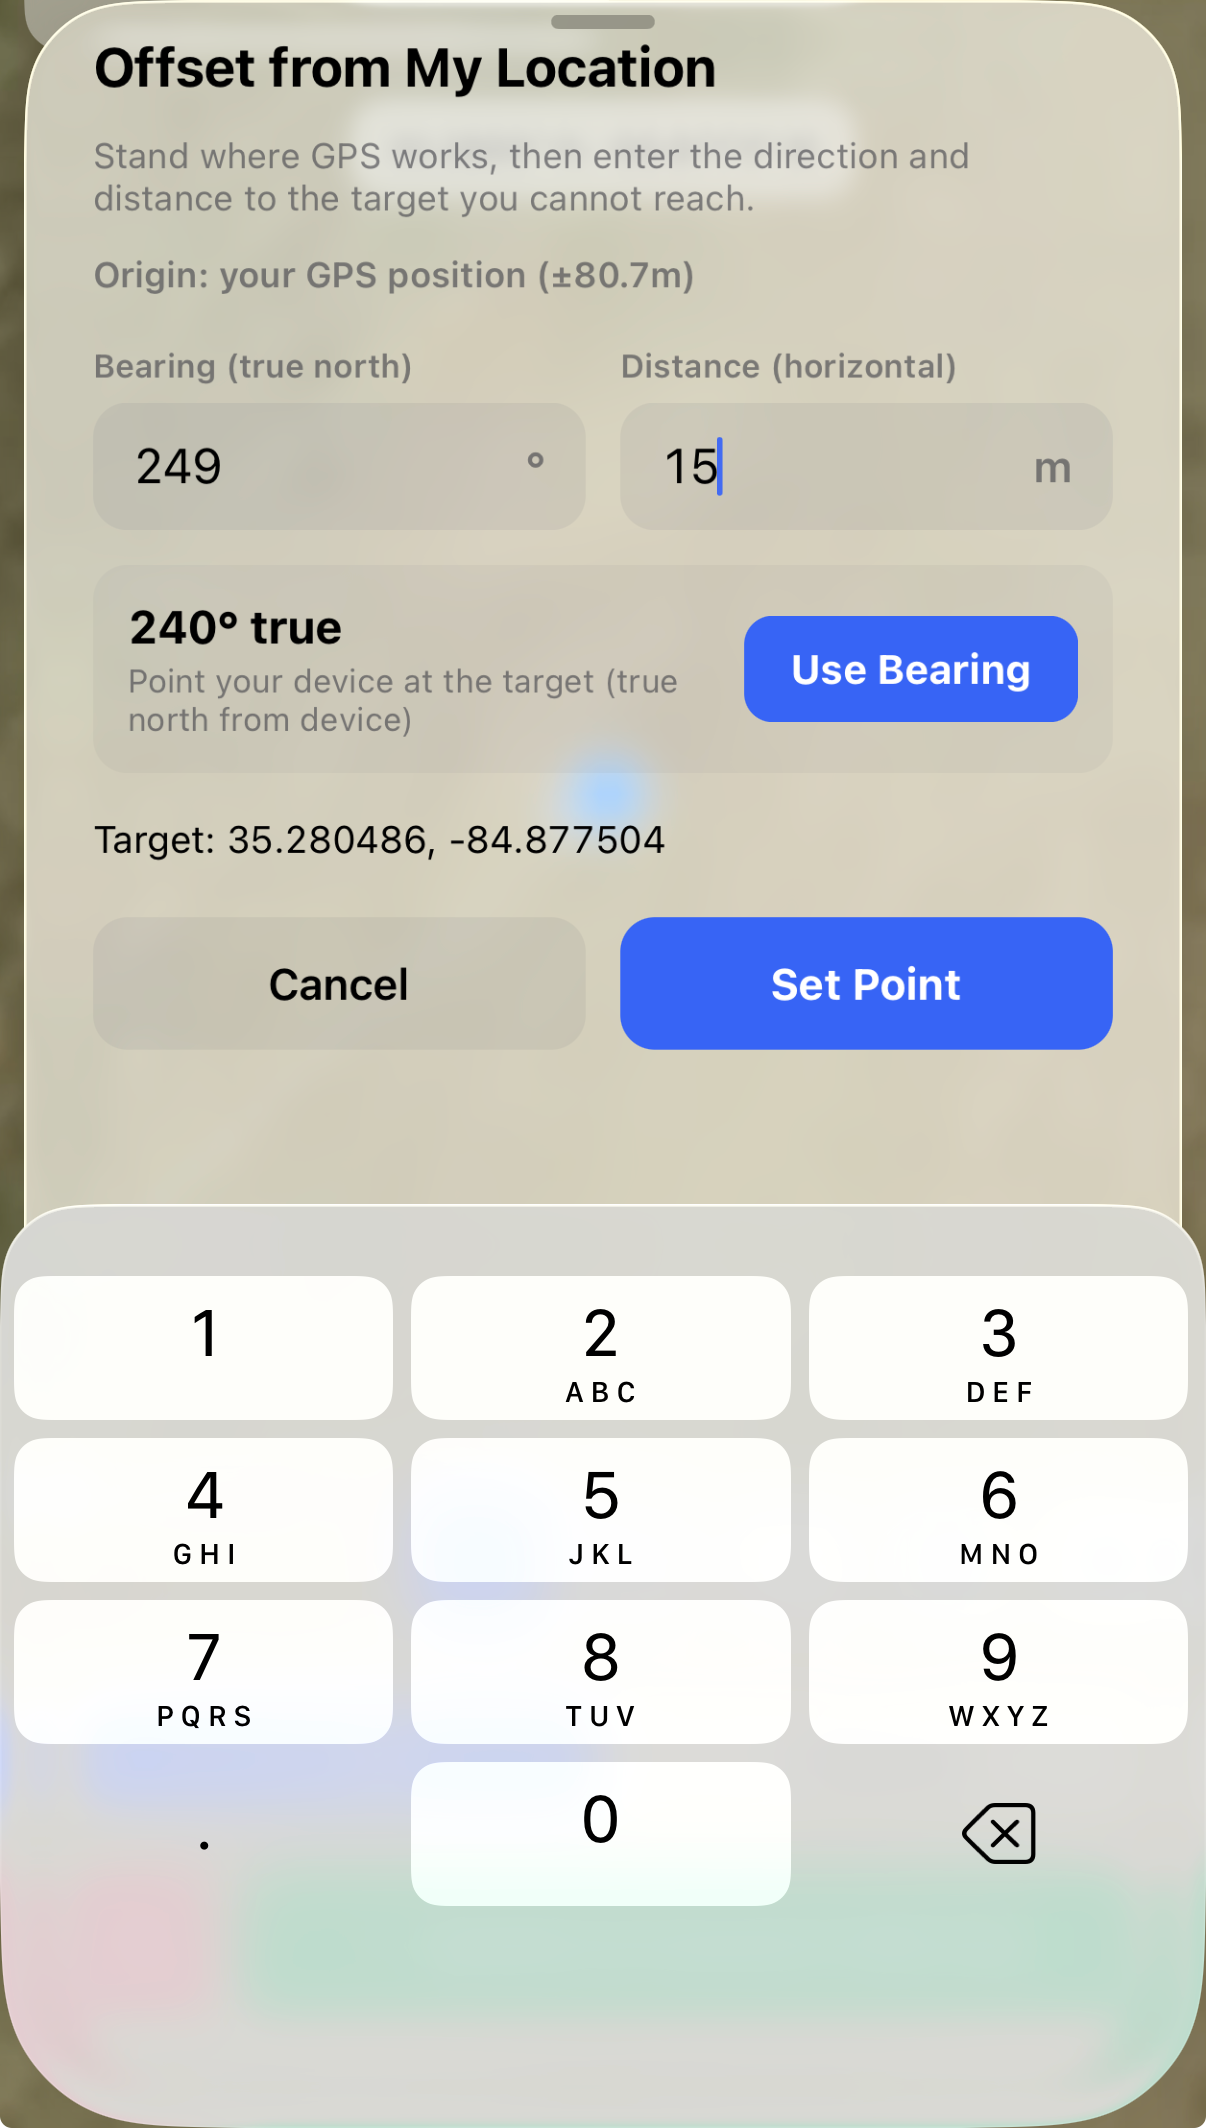
Some targets cannot be stood on. A feature mid-stream, something across a fence, a datum behind a locked gate. **Offset capture** collects them from wherever your GPS actually works.

1. Stand somewhere with a good fix.
2. Point your device at the target and tap **Use Bearing** to take the compass direction. Codifi references it to true north for your position automatically.
3. Enter the distance to the target.
4. The point drops where the target is, while you stay on solid ground.

Nothing about where you stood is discarded. The Record keeps your real coordinates and your GPS quality alongside the bearing and distance you entered, so the derivation is auditable later.

Offset capture lives on the **offset button** in the draw tools while capturing with GPS.

<figure><img src="https://3544178300-files.gitbook.io/~/files/v0/b/gitbook-x-prod.appspot.com/o/spaces%2FJ8P3pqhxdFwQkIOjOUut%2Fuploads%2Fgit-blob-f1311b4f0b4c58f59df371c573d9cc27f47d9dc7%2Fdrawmode-mobile-offset-capture.png?alt=media" alt="The Offset from My Location sheet with bearing and distance fields, a live device heading of 240 degrees true beside a Use Bearing button, and the resulting target coordinates below"><figcaption><p><strong>Use Bearing</strong> takes the direction straight from the device, already referenced to true north. The <strong>Target</strong> coordinates update as you type, and <strong>Origin</strong> keeps the accuracy of the spot you actually stood on.</p></figcaption></figure>

***

### Entering Draw Mode

There are three ways to enter Draw Mode for an existing Record.

<figure><img src="https://3544178300-files.gitbook.io/~/files/v0/b/gitbook-x-prod.appspot.com/o/spaces%2FJ8P3pqhxdFwQkIOjOUut%2Fuploads%2FvvLWLnuEDhI2kgtLHDbW%2FScreenshot%202026-01-08%20at%204.06.34%E2%80%AFPM.png?alt=media&amp;token=d5da1663-4d31-42e0-89b7-56d6c3a3d5ef" alt=""><figcaption></figcaption></figure>

**From the Record Card:**

<figure><img src="https://3544178300-files.gitbook.io/~/files/v0/b/gitbook-x-prod.appspot.com/o/spaces%2FJ8P3pqhxdFwQkIOjOUut%2Fuploads%2FAFOsk1QHCABkrcSoPfEx%2Fimage.png?alt=media&amp;token=85dfeed5-a99a-4456-a1f7-ddd6720420fa" alt=""><figcaption></figcaption></figure>

1. Tap a Record on the map — the Record Card appears
2. Tap the <img src="https://3544178300-files.gitbook.io/~/files/v0/b/gitbook-x-prod.appspot.com/o/spaces%2FJ8P3pqhxdFwQkIOjOUut%2Fuploads%2FVuJXu5jGLFegQ8Yhbxgq%2Fimage.png?alt=media&amp;token=8958aaa0-3db2-4a9f-8945-781f83980e2d" alt="" data-size="line"> **Draw** button (icon matches the geometry type)
3. Existing points load automatically

**From the Location Panel:**

1. Tap a Record → Tap the <img src="https://3544178300-files.gitbook.io/~/files/v0/b/gitbook-x-prod.appspot.com/o/spaces%2FJ8P3pqhxdFwQkIOjOUut%2Fuploads%2FyOaJo38VOYgIcHzqLMpU%2Fimage.png?alt=media&amp;token=f6561796-4514-4fd8-bd92-20be73a29f9f" alt="" data-size="line"> arrow icon to open Location Panel
2. Tap the **Redraw** button

   <figure><img src="https://3544178300-files.gitbook.io/~/files/v0/b/gitbook-x-prod.appspot.com/o/spaces%2FJ8P3pqhxdFwQkIOjOUut%2Fuploads%2FbYBPIEmicpLTfJmIEfLt%2FScreenshot%202026-01-08%20at%204.09.43%E2%80%AFPM.png?alt=media&amp;token=fcf93034-83bf-41d9-a5e0-147061af8c9b" alt=""><figcaption></figcaption></figure>
3. Existing points load automatically

**From Within the Record Details:**

1. Tap the Location button/preview

   <figure><img src="https://3544178300-files.gitbook.io/~/files/v0/b/gitbook-x-prod.appspot.com/o/spaces%2FJ8P3pqhxdFwQkIOjOUut%2Fuploads%2F2Iiz6cRi23BkfkDrXc1O%2FScreenshot%202026-01-08%20at%204.11.17%E2%80%AFPM.png?alt=media&amp;token=d4b30a84-893b-4b61-baa7-2c9e18193454" alt=""><figcaption></figcaption></figure>
2. The map will load with the Record Card
3. Follow one of the two routes previously described
   1. Tap the Draw button
   2. Tap to open the Location Panel, then Redraw

***

### Editing a Single Point

**To move the point to your current GPS location:**

1. Enter Draw Mode
2. Ensure GPS mode is selected
3. Tap **Commit** — the point moves to your current location

**To manually reposition:**

1. Enter Draw Mode
2. Select **Manual** mode
3. Drag the map to position the crosshair
4. Tap **Commit**

***

### Editing Lines and Polygons

When you enter Draw Mode for a line or polygon, your existing points load onto the map as dots along the shape. From here you have several ways to refine the shape.

#### Moving a Point

> **Screenshot placeholder:** *Screen recording (GIF) showing a long-press on a vertex, the crosshair appearing above the finger, dragging the point to a new position, and the line/polygon shape updating in real time.*

You can drag any point to a new position:

1. **Press and hold** on the point you want to move (hold for about half a second)
2. You'll feel a small vibration — that means the point is "picked up"
3. A crosshair appears above your finger so you can see exactly where the point will land
4. **Drag** the point to its new location
5. **Lift your finger** to drop the point in place

The line or polygon shape updates in real time as you drag, so you can see exactly how the change looks before you let go.

{% hint style="info" %}
The crosshair appears above your finger on purpose — so your finger doesn't cover the spot you're trying to place the point.
{% endhint %}

#### Adding Points at the End

To extend a line or add more corners to a polygon:

1. Use **GPS** mode and tap **"Add My Location"**, or
2. Use **Manual** mode, position the crosshair, and tap **"Add Point"**

New points are added to the end of the sequence.

#### Inserting Points in the Middle

Sometimes you need to add a point between two existing points — for example, to add detail to a curve, or to better follow an edge you missed.

**Using midpoint markers:**

> **Screenshot placeholder:** *Screen recording (GIF) showing the small midpoint dots between vertices, tapping one to insert a new point, then dragging the new point into position.*

Small, semi-transparent dots appear halfway between every pair of consecutive points. These are insertion helpers:

1. **Tap one of these midpoint dots**
2. A new point is instantly added at that location
3. You can then press-and-hold to drag it to exactly where you need it

**Using segment tap:**

You can also tap directly on the line between two points:

1. **Tap on the line segment** where you want to add a point
2. The two points on either side of that segment highlight with a blue outline to show where the new point will go
3. The button at the bottom changes to **"Insert Point"**
4. Tap **"Insert Point"** to add a GPS or manual point between them, or press-and-hold on the map to drag a new point into place

#### Selecting and Managing Individual Points

> **Screenshot placeholder:** *Screenshot of the action sheet menu that appears after tapping a vertex, showing the Edit Position, Delete, and Insert Points After options.*

Tap on any point (a quick tap, not a press-and-hold) to select it. A menu appears with options:

* **Edit Position** — Lets you press-and-hold to drag the point to a new spot
* **Delete** — Removes that single point from the shape
* **Insert Points After** — (available on the last point of a line) Prepares to add new points after the selected one
* **Cancel** — Closes the menu without making changes

#### Deleting a Point

To remove a single point from a line or polygon:

1. **Tap** the point you want to remove
2. Tap **"Delete"** from the menu that appears
3. The point is removed and the shape updates immediately

The line or polygon redraws to connect the remaining points. For polygons, you need to keep at least 3 points; for lines, at least 2.

***

### Undo and Redo

Every edit you make is tracked, so you can step backwards if something doesn't look right:

* **Undo** — Tap the undo button to reverse your last action
* **Redo** — Tap redo to restore something you just undid

This covers all types of edits:

| Action                         | What Undo Does             |
| ------------------------------ | -------------------------- |
| Added a point                  | Removes the point          |
| Inserted a point in the middle | Removes the inserted point |
| Moved a point                  | Puts it back where it was  |
| Deleted a point                | Brings the point back      |

You can undo multiple steps in a row. The redo button only appears after you've used undo.

{% hint style="info" %}
**Tip:** If you've made several changes and things look wrong, tap Undo repeatedly to step back through your edits one at a time. This is much safer than starting over.
{% endhint %}

***

### Visual Guide: What the Points Look Like

As you work with your shape, the points change appearance to help you understand what's happening:

| What You See                                       | What It Means                                                   |
| -------------------------------------------------- | --------------------------------------------------------------- |
| **Solid colored dot**                              | A normal point in your shape — you can tap or press-and-hold it |
| **Dot with blue/cyan outline**                     | The currently selected or active point                          |
| **Larger dot with shadow**                         | A point you're actively dragging                                |
| **Small, semi-transparent dot** between two points | A midpoint marker — tap it to insert a new point there          |

***

### Reference Mode

Reference Mode lets you select an existing map feature to reference or snap to while you draw. Tap the **Reference** button (link icon) in the draw controls to activate it.

> **Screenshot placeholder:** *Draw Mode controls bar with the Reference (link icon) button visible.*

<details>

<summary><strong>How to use Reference Mode</strong></summary>

1. While in Draw Mode, tap the **Reference** button (link icon) — Reference Mode activates
2. The map enters a selection state — normal point-adding is paused
3. Tap on any Project area, overlay, annotation, or other mapped feature to select it as your reference
4. If multiple features overlap, a selection sheet appears — choose the one you want
5. Tap **Done** to exit Reference Mode and return to drawing — your reference stays active
6. Draw your points normally; the reference feature remains visible on screen as a guide

> **Screenshot placeholder:** *A reference feature selected and highlighted on the map with the "Done" button visible.*

**Clearing a reference:** Tap the Reference button again → **Clear Reference**. This removes the link without affecting captured points.

</details>

***

### Deleting an Entire Location

To remove all location data from a Record:

<figure><img src="https://3544178300-files.gitbook.io/~/files/v0/b/gitbook-x-prod.appspot.com/o/spaces%2FJ8P3pqhxdFwQkIOjOUut%2Fuploads%2FsI6r8bZPCB8kXMTEaq5P%2FScreenshot%202026-01-08%20at%204.12.24%E2%80%AFPM.png?alt=media&amp;token=9ff9994d-ffd3-48a2-9ec8-abf62af807bf" alt=""><figcaption></figcaption></figure>

1. Open the Location Panel
2. Look for the **Delete** or **Remove Location** option
3. Confirm the deletion

This removes the geometry but keeps the Record itself — no field data is lost.

***

### Tips

* **Zoom in before editing vertices.** The closer you are, the easier it is to tap or drag the right point without accidentally selecting a neighbor.
* **Use undo freely.** Every action is reversible — don't hesitate to experiment with point placement and undo if the result isn't right.
* **Vertex editing is faster than redrawing.** If a shape is mostly correct, tap the specific point that needs adjusting rather than starting over.
* **Reference Mode is intentional.** If you want to trace or snap along an existing boundary, activate Reference Mode first, select your reference, then draw. This way your taps won't accidentally select map features instead of placing points.
* **GPS and manual modes can be mixed.** You can add some points by GPS and others manually within the same session — switch modes at any time during a line or polygon capture.
* **Commit only when you're ready.** You can undo and redo as many times as you need before committing. Changes are not saved to the Record until you tap **Commit**. If you tap the **red X** instead, your edits are discarded and the original shape is restored.